What is Masking in Photoshop?
Adobe Photoshop masking is one of the most effective. It is possible to use masks to produce very beneficial visual effects. There is a variety of uses for masks in Photoshop, from mixing pictures to shaping texts. We shall learn here about the two types of masks that Adobe Photoshop uses: surface masks and example-cutting masks. You should both be useful in different ways, and you should consider these crucial differences if you wish to master Adobe Photoshop.
Difference Between Layer Masks and Clipping Masks
Adobe Photoshop: Layer Masks
Capacity masks are a very useful feature of Adobe Photoshop. The way to Photoshop mastery starts with the acquisition of the strength of layer masks.
A layer mask basically controls the visibility of a layer.
The layer masks use a single mask, which can hide portions of a layer when exposing other layers underneath it, that is applied to a single picture. The visibility and opacity of the surface are modified via the mask.
It can have monochromatic gray colors like white, black, and various gray colors between each other.
How to Create a Layer Mask
Start selecting the photo you want to manipulate by opening Photoshop software. The item you want to mask is selected using various devices. This example uses the magic wall tool to pick the pumpkin object, but also a marquee tool or a tool for rapid choice.
Step 1: Click on the button Mask to create a new mask layer once the selection procedure is enabled.
Step 2: The pixels selected are shown while the pixels are not chosen. You can see that the mask is added to the layer palette itself if you look into the layer palette.

Step 3: You can now choose to apply it to a completely different context because you have the layer masks.
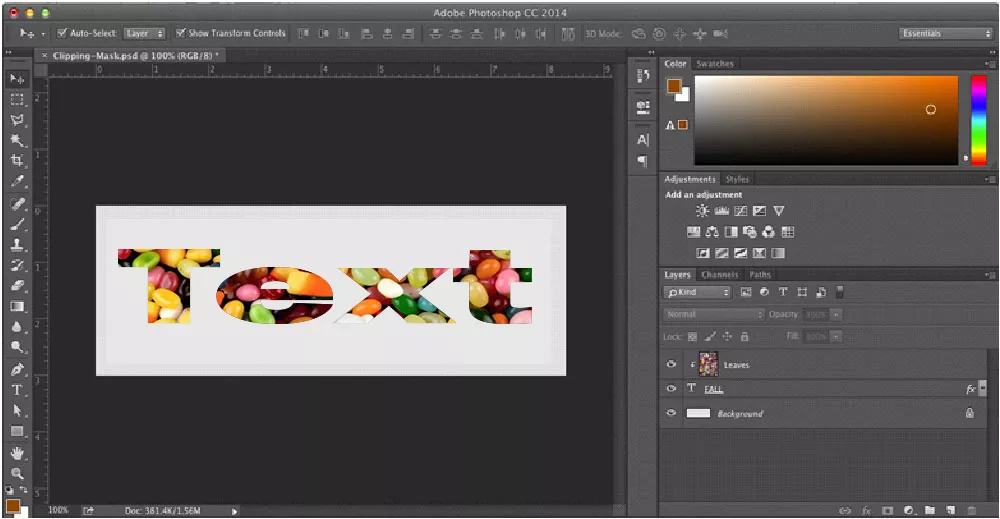
Adobe Photoshop: Clipping Masks
You can cover parts of an image by cutting masks but these masks are made of multiple layers, whereas surface masks only use one layer. A clipping mask is a form that hides certain works of art and only shows the object. Cutting masks can be created not only from forms but also for vector and text objects.
The mask works in the same way as surface masks, except that it does not have the single color scope of grayscale. The surface below them then acquires transparency.
How to Create a Clipping Mask
Step 1: In Adobe Photoshop, begin by typing the text you would like to mask to create a clipping mask with text.

Step 2: Then add a picture above the layer of text you want to cover. Right-click on the surface of the image and choose to create a cutting mask.

Step 3: You should now see the letters you have produced show your image. You can see that the mask is generated by adding two layers if you look at the pallet layers.
This genius masking function has many applications. During animation lessons, you can learn more about surface masks and masks.
Text stylizing and photo mixing are just some examples of how Adobe Photoshop masks can enhance designs.
At times, it is important to provide high-quality photos with the aid of professional expertise. Photo retouching up is dedicated to highly professional and low-priced services.
Our services include all aspects of editing. To give you the best performance, we use the new Photoshop technology. The photo retouching up ensures these features exclusively, which is why you receive the best service.